In this section, we'll show how to use FusionMaps in your web applications. As you already know, FusionMaps uses XML data files to render the maps. As such, you can use FusionMaps with any of your dynamic web scripting languages like ASP, .NET, PHP, JSP, ColdFusion, Ruby on Rails etc. From your scripting language, all you would need to do is dynamically generate the XML data document (containing data from your data sources), and then convey it to FusionMaps.
Here, for the purpose of learning, we'll hand code the the XML data files. When working with scripting languages, you can replace this process with scripts that dynamically build XML data document in variables (using either String concatenation or native XML Object methods).
If you're a non-technical user and want to generate maps without using any programs or scripts, you can switch to the next section "Using the GUI", where we explain how to visually configure and generate a data-driven map, without getting into any programming.
Let's now jump to our example.
For our first example, we'll create a World Map to show the Population Distribution across continents. Our motive is to display the following data visually on a map.
Population in Millions
Continent |
Population (in Millions) |
North America |
515 |
South America |
373 |
Asia |
3875 |
Europe |
727 |
Africa |
885 |
Australia |
32 |
Assembling the required elements
To create any map, you need to make sure that you've the following things ready with you:
- The SWF File of the map – For our world map, it's called FCMap_World.swf. It is present in the Download Package > Maps folder.
- Map Specification Sheet – This sheet lists the IDs of the entities of that map. For the specification sheet of each map, refer to the section "Map Specification Sheets" section of this documentation.
- XML Data Document – This contains the actual data that you want to show on the map. The XML has to be built by you.
- FusionMaps JavaScript Class - This JavaScript class helps you embed maps in your web pages. This class is present in Download Package > JSClass folder.
Let's create a new folder for this example. We name the folder as HowToUse. In the download package, it's present under Code folder.
Copy FCMap_World.swf file in this folder along with FusionMaps.js. That completes our initial setup for the map. We'll next see how to create the XML data for this map. But, before that, let's just glance through the Map Specification Sheet of the world map, as this will be required to create the XML data.
The Entities table for the world Map is reproduced below (from the World Map Specification Sheet).
An entity for a map is the smallest item that we're dealing with on the map. For example, in a World Map showing continents, each continent is an entity. In a continent map showing countries, each country is referred to as an entity. Similarly, if a country map is showing states, each state is referred to as an entity.
Entity Id |
Entity Short Name |
Entity Long Name |
NA |
NA |
North America |
SA |
SA |
South America |
EU |
EU |
Europe |
AS |
AS |
Asia |
AF |
AF |
Africa |
AU |
AU |
Australia |
As you can see above, each entity on the map has three properties:
- Internal Id (Entity Id) through which we refer to that entity in the XML data document.
- Short Name of the entity which gets displayed on the map.
- Full Name of the entity, which by default is shown as tool tip for the entity. You can also opt to show full name on the map instead of short name.
You can define your own IDs, short names and long names for each entity – we'll see that later.
Since this is our first example, we'll try and put up a basic map to show the population data. Create a file FirstData.xml with the following XML:
<map borderColor='005879' fillColor='D7F4FF' numberSuffix='
Mill.' includeValueInLabels='1' labelSepChar=': ' baseFontSize='9'>
<data>
<entity id='NA' value='515'
/>
<entity id='SA' value='373'
/>
<entity id='AS' value='3875'
/>
<entity id='EU' value='727'
/>
<entity id='AF' value='885'
/>
<entity id='AU' value='32'
/>
</data>
</map>
In the above code, we're basically providing the tabular data to map in XML format, as FusionCharts FusionMaps accepts only XML.
Each XML data document for FusionMaps starts with <map> element. There are a number of cosmetic and functional attributes which you can specify for <map> element. You can see them in "FusionMaps and XML > XML Attributes" section. For this example, we've defined the border color of the map, fill color, number suffix (to be added at the end of every number), a flag to include data values in map labels, the label separator character and font size attributes.
Immediately inside the <map> element, we've defined <data> element, whose child nodes contain the actual data. To define data for each entity on the map, an <entity> element is added as under:
<entity id='NA' value='515' />
The id here corresponds to the internal Id of the entity (picked from Map Specification Sheet). value denotes the actual value which we want to show on the map.
That completes the XML part of the application. Now, for the map to use this XML, we first need to put the map in an HTML page. We'll see that next.
Using the Visual GUI provided in Download Package > Tools > GUI, you can automatically generate the Entity XML template for any map. That is, you would not have to manually write the <entity> element for each entity of the map. Instead our GUI will build this for you, and you can plug it in your code and then replace the values with values from your data store.
Create a file FirstMap.html in the same folder with the following code:
<html>
<head>
<title>My First Map</title>
<script language="JavaScript" src="FusionMaps.js"></script>
</head>
<body>
<div id="mapdiv" align="center">
FusionMaps.
</div>
<script type="text/javascript">
var map = new FusionMaps("FCMap_World.swf", "Map1Id", "750", "400", "0", "0");
map.setDataURL("FirstData.xml");
map.render("mapdiv");
</script>
</body>
</html>
Here, we're first including FusionMaps JavaScript Class file (FusionMaps.js). This file is required to include the map in an HTML page.
You can also directly provide the HTML <OBJECT> code to embed the Flash movie for map, but then it would show the "Click to activate..." message in Internet Explorer. Also, using this class makes a lot of map actions very easy to invoke.
<script language="JavaScript" src="FusionMaps.js"></script>
Each map in the page needs to reside in a DIV. So, we create a DIV in the page body with a unique id (mapdiv in example above).
<div id="mapdiv" align="center">
After that, we instantiate the map by creating an instance of FusionMaps class.
var map = new FusionMaps("FCMap_World.swf", "Map1Id", "750", "400", "0", "0");
Here, map is the name of the JavaScript object that contains reference to our map.
As parameters, we pass:
- URL of SWF file of the map that we intend to use
- DOM Id for the map - You can give any id for the map. Just make sure that if you're using multiple maps in the same HTML page, each map should have a unique Id.
- Required width and height of the map. For best results, always use proportionate width and height of the map compared to the original width and height. The original width and height of each map is given in its Specification Sheet.
- The last two parameters are debugMode and registerWithJS and are normally set to 0. We'll explain those parameters later.
After this, we convey the path of XML data document to the map. To do this, we call the setDataURL() method of our map object.
map.setDataURL("FirstData.xml");
Finally, we ask the map to render by calling render() method of the map object and specifying the Id of the DIV which we want the map to occupy.
map.render("mapdiv");
Using the FusionMaps Visual GUI provided in Download Package > Tools > GUI, you can automatically generate the HTML code for embedding the map.
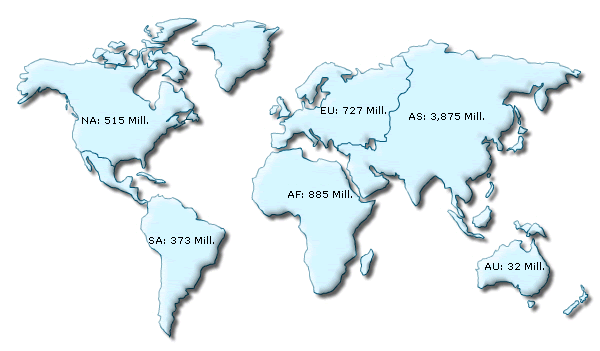
Time to see the efforts fructify - when you now run the HTML file, you should see a map as under.
 |
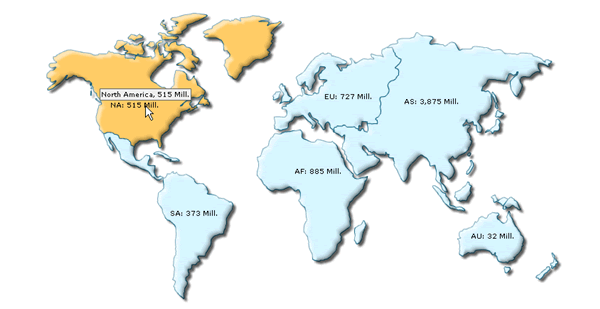
Very basic – but exactly what we had intended to. When you roll your mouse over any continent, you'll see the hover color and tool tip information as shown under:
 |