Markers > Overview
FusionMaps v3 introduces the concept of user-defined Markers on the map. Markers are points that you can define anywhere on the map to represent various locations like cities, junctions, houses, office locations, malls or any other entity that needs a point representation.
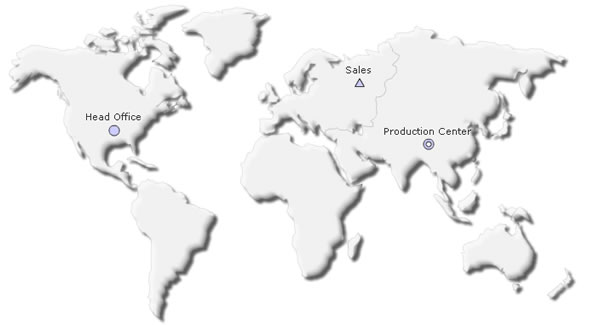
For example, if you see the map below, you'll see that we've defined 3 office locations on the world map.

The following three markers have been defined on this map:
- Head Office
- Sales, &
- Production Center
The XML for the above map can be written as under (we'll explain it coming sections):
<data>
<entity id='NA' />
<entity id='SA' />
<entity id='EU' />
<entity id='AS' />
<entity id='AF' />
<entity id='AU' />
</data>
<markers>
<definition>
<marker id='HO' x='140.09' y='165.19' label='Head Office' />
<marker id='PF' x='533.37' y='182.25' label='Production Center' />
<marker id='SA' x='447.04' y='106.57' label='Sales' />
</definition>
<application>
<marker id='HO' shapeId='circle' />
<marker id='PF' shapeId='arc' />
<marker id='SA' shapeId='triangle' />
</application>
</markers>
</map>
As you can see above (in the bold block), we've first defined the three markers on the map. Post that, we've applied all the markers, so that they're visible on the map. The <definition> block contains marker definitions and the <application> block contains the list of markers that we need to show on this map. Both are enclosed within the <markers> element to indicate that they're part of markers.
You do not need to manually set the X and Y Positions for the markers. Instead, you can use our visual GUI to efficiently build your markers.
FusionMaps allows you to define any number of markers on each map and then show only a few of them. This is especially useful in cases where you want to build a central marker repository indicating all markers for a certain map, and then show only particular markers based on your requirements. For example, if you've to show hits received by cities within a particular country, you can define markers for all the cities for that map, and later opt to show only those marker points from which hits have actually been received. This lets you create far more filtered views of your data.
FusionMaps offers the following key features for markers:
- "Sticky" Markers i.e., the markers on FusionMaps are size independent. So, irrespective of whatever size you choose for your map and whatever size the markers were defined using, they will always show up at the right location.
- Easy defining of markers using the Visual GUI. You can visually click on the map and add additional information to generate the markers.
- Custom shapes for markers, with support for various cosmetics attributes. If you do not want to create custom shapes, you can also use one of the four inbuilt shapes - circle, arc, triangle or diamond.
- Option to show markers using images, instead of geometric shapes. These images can be dynamically loaded at run-time. Also, you can change the alignment of images to better pin-point locations.
- Option to customize marker labels, label alignment, tool tip text etc.
- When using same shape to show different markers, scaling concept can be applied to efficiently show data distribution.
- Customizable border & background colors for markers.
- Customizable font properties for marker labels.
- Animation and effects supported for both markers and marker labels.
To make your lives easier, we've created marker definitions for important cities in the most of the maps and provided them as XML to you. You can re-use the definitions from those XML files present in Download Package > MarkerXML folder.
Now that you're acquainted with the basic concepts, let's see how to create markers as shown in the above example.